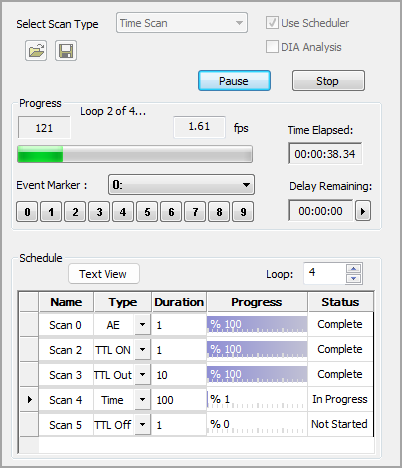
The Scheduler is an option when choosing a Time Scan. The Scheduler will setup and run a sequential series of user defined Scans. The Scan may be paused at anytime during the experiment to adjust Capture Settings, including exposure and gain. To setup a Scheduled scan go to the Sequence pane and select Time Scan from the Select Scan Type drop-menu and check the Use Scheduler option. Once the scan has been setup use the Save Scan icon to save scan settings for repeated use. Use the Open icon to load a saved scan. The example below shows scans being setup and a Scan in progress.

Each scan is defined by Name, Type and Duration which are setup by the user. Additional Scans may be added by right-clicking on Scan name and selecting Add SubScan. You may also Copy and Paste, or Remove unwanted scans in the same manor. Use the Loop controls to repeat the entire sequence of scans. Click Text View in order view the schedule at as text file for easy viewing.
By default the scans are numbered sequentially, enter a custom name by double clicking on scan name and entering a new name. Left mouse click outside of the name box to save the name.
Select the scan type using the Type drop menu. To access the scan controls, double-click the right-facing arrow on the left side of the panel. The dialog that opens provides the necessary controls for the type of scan selected.
Note: Simultaneously send TTL pulses while acquiring images using the asynchronous mode. Simply enter pulse count, duration, etc. then select Asynchronous in the TTL Out dialog. Next setup the time scan and when you click start both scans will run simultaneously.
The duration indicates how many actions will occur during a scan. For example, in a time-lapse scan, the duration indicates how many images will be acquired or how long the scan will acquire for. For TTL Out, it is the number of out pulses and the number of images to acquire for Z scans.
Displays the live progress of the scan as a percent complete.
Indicates the whether the scan has started, is in progress or is complete.
The Scheduler Scan Settings panel is a condensed set of controls to select where and how the data will be saved.

Use AutoSave to define where and how to store acquired data.
Determines how the data is structured when written to a data document.
Determines if a live view is displayed in the image display or if acquired images may be reviewed during the acquisition.