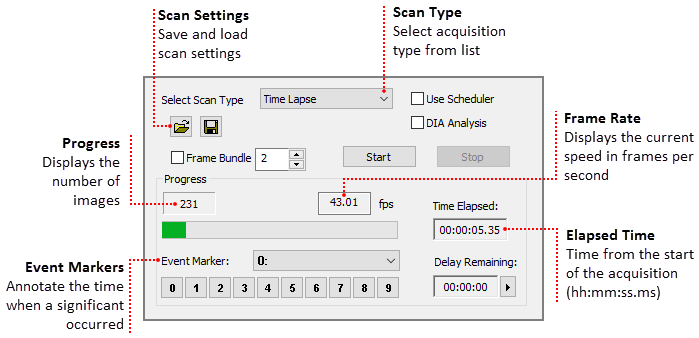
The Sequence pane provides a variety of options for defining a time lapse or high speed streaming. The sequence controls at the top of the pane (shown below) are always visible and used for selecting the scan type and reporting in real time, information about an ongoing sequence. This sections covers the basic steps for setting up a typical time lapse. Time Lapse allows images to be captured for display, archiving or processing, while incrementing a Time Lapse delay before each image. This can provide the ability to collect temporal information on static objects in the field of view. To run a Time Lapse, go to the Sequence pane and select Time Lapse from the Select Scan Type drop-menu. Enter any field delays and a duration then click Start. Click the Save Scan icon to save scan settings for repeated use. Use the Open icon to load a saved scan.

Note: External control mode, Hamamatsu cameras have various external control functions for applications that require the camera to synchronize with external equipment. The external control modes vary based on the camera model, please refer to the camera's instruction manual for more information on controlling the camera externally. To see the capture modes that are available for the camera, expand the Advanced Camera Properties panel in the Capture pane and click on the Capture Mode drop-list. To enable external control of the camera, select the desired mode form the drop-list. When using an external trigger mode, HCImage will not go Live, perform a Capture1 or begin a capture sequence until the camera is triggered. 
Hint: Use Frame Bundle to optimize performance in both speed and timing when using a sub-array while streaming an image sequence. The maximum number of frames available for bundling is relative to the size of the sub-array. Choosing the maximum number of frames to bundle doesn't necessarily mean maximum performance.
The Scan Settings panel provides a variety of options for defining a time lapse to fit the needs of your application. This section provides three examples of typical time lapse settings, using each of the storage options.
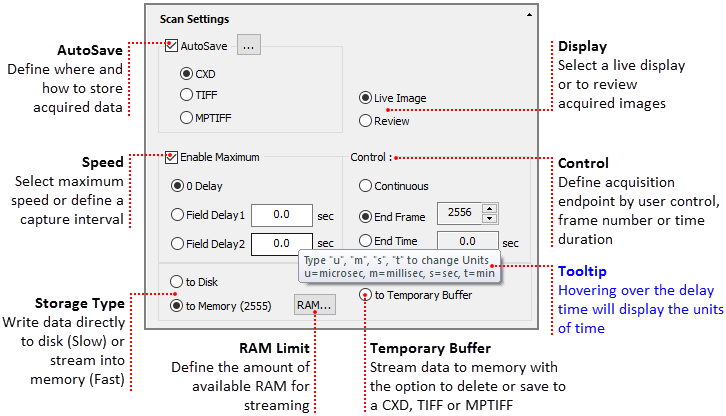
Use AutoSave to define where and how to store acquired data.
Note: MPTIFF files have a 65,000 image limit and 4 GB size limit. For image sequences having more than 65,000 images or larger than 4 GB, multiple MPTIFF files will be saved and numbered sequentially.
Determines if a live view is displayed in the image display or if acquired images may be reviewed during the acquisition.
Select the maximum speed or a capture interval.
Select whether write directly to disk or to memory for high speed streaming.
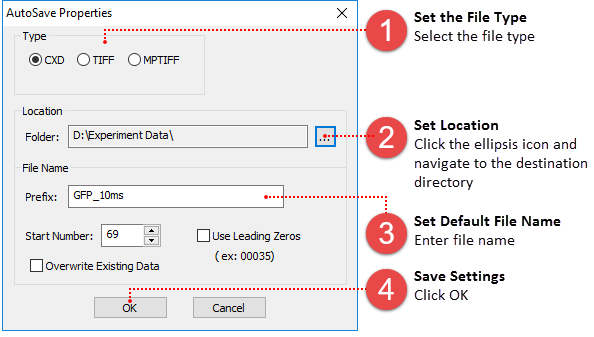
In the AutoSave Properties dialog, the user can determine how and where to store the acquired data. Image data can be saved as a CXD, TIFF or MPTIFF. The example below provides a description of the Auto Save Properties dialog.
Note: MPTIFF files have a 65,000 image limit or 4 GB size limit. For image sequences exceeding these limits, multiple MPTIFF files will be saved and numbered sequentially.
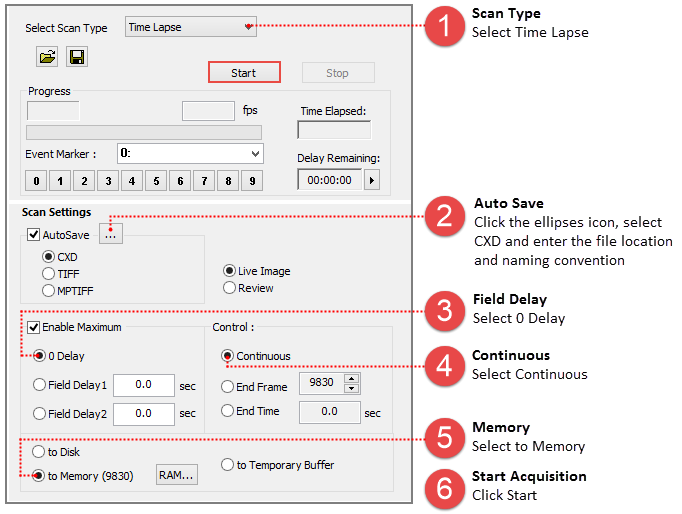
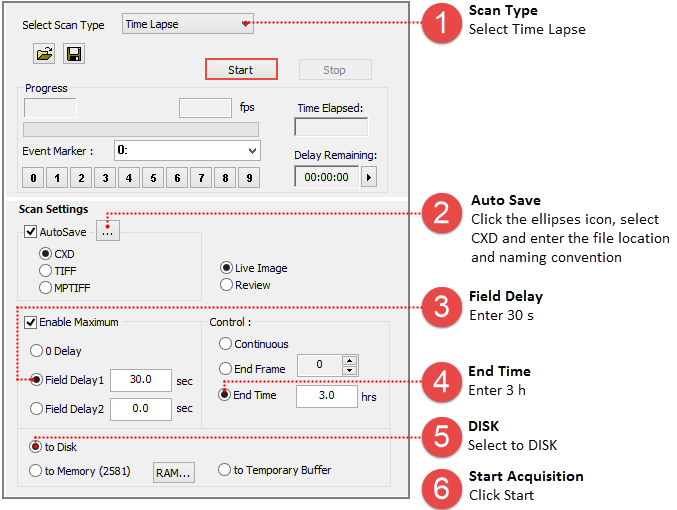
The time lapse in this example will acquire an image every 30 seconds for 3 hours and the data will be saved as a cxd. Once your are satisfied with capture settings and the sample is in focus, go to the Sequence pane and follow the steps below.
Acquired data is stored in memory with the option to review the image sequence before saving or deleting it. When Temporary Buffer is selected, End Frame is automatically enabled and display the maximum number of frames that can be streamed to memory. Once your are satisfied with capture setting and the sample is in focus, go to the Sequence pane and follow the steps below.
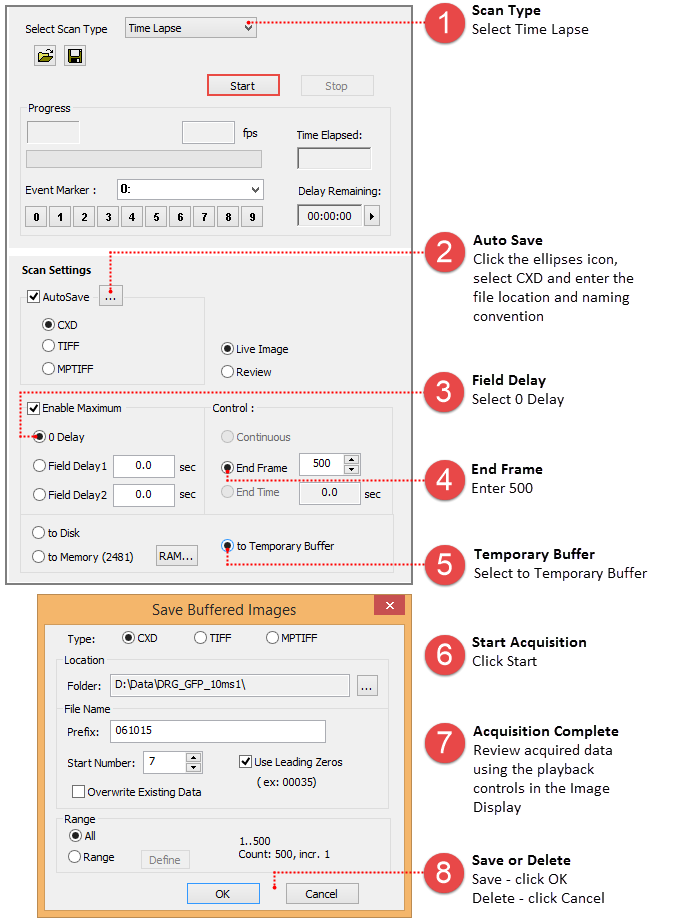
Note: Streaming to the Temporary Buffer is very useful because it provides the option to review the image sequence when trying to capture specific event and for demonstrating camera speeds.
The time lapse in this example will store images in memory until the acquisition is stopped or runs out of memory at which point the acquired images are saved to disk for the remainder of the time lapse. Once your are satisfied with capture settings and the sample is in focus, go to the Sequence pane and follow the steps below.
