Open topic with navigation
Scheduler Example
This example will guide you through the steps involved in organizing an experiment into defined series of scans. First, create a time line defining each component of the experiment as a series of step in sequential order. Next, organize the steps into scans based on the type of action to be performed (e.g., acquisition, delay, etc.) and the interval. Then enter the scans in the scheduler and you are ready to go.
Define the Schedule
The diagram below provides a partial time line of the experiment. Each component is broken down and plotted as interval time (red line), with the individual intervals labeled by action. Components are grouped into scans (purple line) and labeled by type.

The schedule for the experiment consists of seven scans, the scans are defined below:
- Scan 0 (Acquire) 340 nm and 380 nm with 50 ms exposures and a field delay of 900 ms for 15 minutes
- Scan 1 (Pulse) excite at 500 nm for 350 ms single pulse
- Scan 2 (Wait) delay of 650 ms
- Scan 3 (Acquire) 340 nm and 380 nm with 50 ms exposures and a field delay of 900 ms for 10 minutes
- Scan 4 (Pulse) excite at 380 nm for 350 ms single pulse
- Scan 5 (Wait) delay of 650 ms
- Scan 6 (Acquire) 340 nm and 380 nm with 50 ms exposures and a field delay of 900 ms for 10 minutes
Create the Schedule
Before setting up the scans we need to enter the capture settings and configure the TTL settings for triggering pulses. For this example, the light source is controlled using TTL, were pin 1 (340 nm), pin 2 (380 nm), and pin 3 (500 nm).
[Capture Settings]
- Go to the Capture tab and select RGB Color: 2-Band from the drop-menu.
- Select 340 nm and 380 nm from the filter drop-menu and enter a 50 ms exposure for each channel.
[I/O Setup]
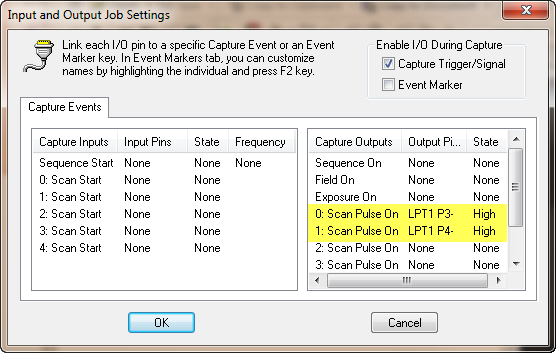
- Click the I/O Setup button in the Devices tab, the TTL trigger outputs are identified as Scan Pulse On, 0-4.
- For 0: Scan Pulse On, click None under Output Pins and select LPT1 P3.
- For 1: Scan Pulse On, select LPT1 P4, the pin state will automatically be set to high.

[Create Scans]
- Go to the Sequence pane and select Use Scheduler.
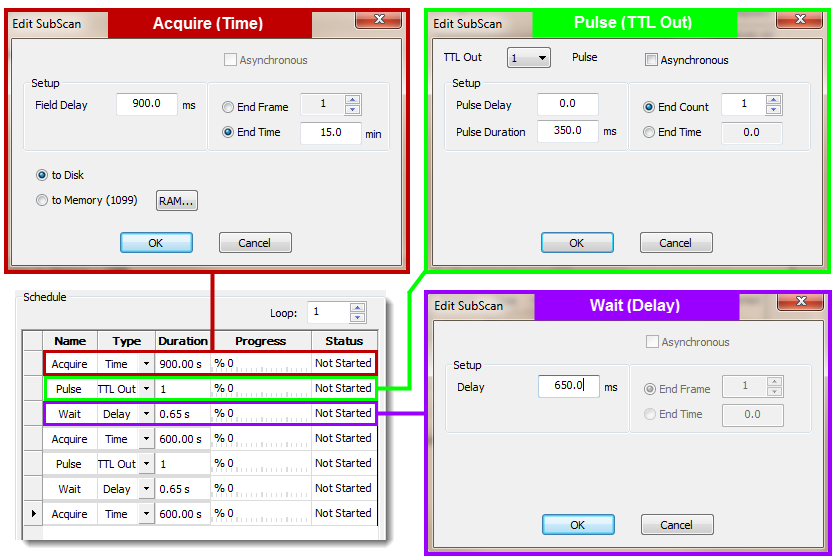
- (Scan 0) Enter new name, double-click the Scan 0 and enter Acquire. Enter acquisition settings, double-click Time, enter Field Delay 900 ms, End Time 15 min and click OK. Right-click and select Add Subscan.
- (Scan 1) Change the name Scan 1 to Pulse. Select TTL Out from the Scan Type drop-menu. Double-click TTL Out, and select 1 from the TTL Out Pulse drop-menu for 500 nm excitation. Enter a Pulse Duration of 350 ms and click OK. Right-click and select Add Subscan.
- (Scan 2) Change the name toWait and select Delay from the Scan Type drop-menu. Double-click Delay, enter a Scan Delay of 650 ms and click OK. Right-click and select Add Subscan.
- (Scan 3) Change the name to Acquire, enter the acquisition settings, Field Delay 900 ms, End Time 10 min and click OK. Right-click and select Add Subscan.
- (Scan 4) Change the name to Pulse, select TTL Out, select 0 from the TTL Out drop-menu for 380 nm excitation and enter a Pulse Duration of 350 ms. Click OK, then right-click and select Add Subscan.
- (Scan 5) Change the name toWait, select Delay, enter a Scan Delay of 650 ms and click OK. Right-click and select Add Subscan.
- (Scan 6) Change the name to Acquire, enter the acquisition settings, Field Delay 900 ms, End Time 10 min and click OK.
- Click Start.


