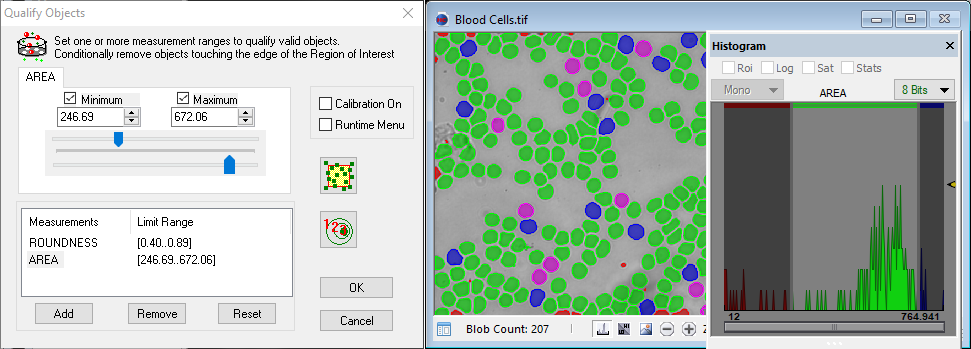
Similar in function to the binary editor, Qualify is another level of refinement and provides the means to eliminate superfluous information and collect more accurate data. Binary Image Qualification or Qualify, compares object populations against one or more qualification criteria as a type of filtering system to reject various objects based on size, shape, intensity or position.

Eliminate unwanted objects by selecting one or more of over 100 included measurements. Simply click the Add button, select a measurement and then use the min/max slider controls to set the desired range. Each object in the binary image is tested against the minimum and maximum values in the range. If the object is included in the range the color remains green or silver. Disqualified objects are displayed in Red![]() (Qualification Status) Object is disqualified by the minimum value of the currently selected qualification criteria., Blue
(Qualification Status) Object is disqualified by the minimum value of the currently selected qualification criteria., Blue![]() (Qualification Status) Object is disqualified by the maximum value of the currently selected qualification criteria. and Magenta
(Qualification Status) Object is disqualified by the maximum value of the currently selected qualification criteria. and Magenta![]() (Qualification Status) Object is disqualified
by previously selected qualification criteria.. For detailed information on the Qualify controls, removing edge objects, . . see "Qualify Tools."
(Qualification Status) Object is disqualified
by previously selected qualification criteria.. For detailed information on the Qualify controls, removing edge objects, . . see "Qualify Tools."
Selected Measurements and their Limit Range are displayed below the slider controls. The left-hand column in the list displays the name of each qualification. The right-hand column in the list displays the minimum and maximum limit definitions for each qualification. When multiple measurements are added to the list, selecting a measurement will reconfigure the display so that the current measurement range will show in red, green or blue for adjustment. The list will re-order itself in order to list the currently selected measurement last, since a given criterion may only be used to eliminate objects not yet eliminated by other criteria, not to re-instate them. Objects that are disqualified by other measurements in the list are displayed in Magenta.

Note: Create Custom Measurements and Please note that several of the features described below are task specific (i.e. color images only) and will appear grayed out when not available. Color colocalization, overlap measurements etc are not always valid.
Any of the measurement ranges may be modified or removed. Click on a measurement to select it and adjust the range using the slider controls. To add items to the qualification criteria list, click the Add button and select the measurement to use for the new criteria. All Object Measurements and Custom Measurements can be used. To remove a qualification criteria from the list, select the item in the list and click Remove. To remove all criteria from the list, click the Reset button.
This sections provides a detailed description for all of the available features in the Identify Dialog.
The Minimum measurement value is displayed in the left hand slot in the Qualify dialog. Object measurement values have to be above or equal to this value in order to qualify and be set to green or silver. The value can be entered or changed using the spin controls or dragging the slider.
The Maximum measurement value is displayed in the right hand slot in the Qualify dialog. Object measurement values have to be below or equal to this value in order to qualify and be set to green or silver. The value can be entered or changed using the spin controls or dragging the slider.
This checkbox option toggles the display of the Threshold Minimum and Maximum measurement range to display in calibrated units or pixels. Both the Qualify dialog and the Image Histogram data will reflect this selection.
Note: If Calibration On is checked, when the Qualify Dialog is exited the values saved in the Workfile will be saved in calibrated units according to the current scale factor as selected in the Spatial Calibration Dialog. If it is not checked, the Qualify range will be saved in pixels. This makes it possible to use the same Qualify range with the same units, but different magnifications.
When this checkbox option is selected and a Workfile is being executed, an interactive Qualify dialog will pop-up. This allows the operator to check and correct the qualification criteria limiting values for the particular image during execution. The pre-set values are applied and changes to these values are saved to the workfile when the OK button is used to exit the dialog.
Hint: This option can be used to start a Scan with interactive supervision of the Qualify values, and then can be checked OFF when it is clear that the values are stable and do not need to be changed anymore.
Exiting the dialog via the OK button will save the options in the current Workfile and delete all disqualified objects from memory.
Note: After exiting the Qualify dialog by selecting OK, all of the deleted objects are no longer available to any of the Workfile icons. If Qualify is reopened only the accepted objects are displayed. In order to review a given qualification step while in Workfile edit mode, it is necessary to click on each of the preceding steps and exit them via their OK buttons. This effectively rebuilds the workfile and recreates the original object population.