
Contrast stretching, sometimes referred to as scaling, redistributes the range of intensity values used to display the image based on a range that you specify. Adjusting the upper and lower limits of the range will result in a decrease or increase in the brightness of the image. For color images this may be done per channel (unlocked) or uniformly (locked). By default, the range is based on the bit depth of the camera and is displayed in the histogram. For example, a 16-bit camera will acquire images with 65,535 possible intensity values (gray-levels). In some instances, all of the pertinent image data is contained within a range in the lower end of the intensity values. By adjusting the upper and lower limits of the range in an image, you can more easily see variations in brightness that might otherwise be indistinct.
Note: Intensity profile data is not affected by the contrast enhancement. The contrast enhancement function is an image display tool rather than an image processing operation and operates only on the display data. If it is desirable to work on the contrast-enhanced image, copy the Display Image to an image document.
The contrast tools are incorporated into the histogram display and can be enabled by selecting Contrast below the histogram. Adjust the range of intensity values by dragging the highlighted upper or lower limit bars located on either end of the histogram. The selected range is displayed above the histogram just below the standard deviation and is also displayed in the Stats windows when enabled. Select from the various monochrome and pseudocolor enhancements in the Curve drop-menu to draw attention to specific aspects of the image that would otherwise be indistinct. For color images, various contrast stretches or pseudocolor look-up table (LUT) enhancements may be made on each channel separately (Unlocked mode) or simultaneously on all channels (Locked mode).
For color images, use the channel display to select which channel or channels to display in the histogram. The selected channel(s) are displayed in color and the histogram for the other channels is displayed as gray. When applying contrast and the channels are unlocked, select Red, Green or Blue to adjust the contrast for the individual channels. The contrast can only be adjusted on single channels (i.e., Red, Green or Blue) when unlocked or all channels (i.e., RGB) when locked.
Displays the bit-depth of the image. Changing the display depth of the image using the Current Display Depth drop-menu does not affect the actual data, but can improve the viewing clarity. The maximum range value will change according to the selected display depth, e.g., 8-bit (255), 12-bit (4095), 16-bit (65535).
Click Contrast to toggle the contrast enhancements on/off. When checked, the contrast controls are enabled and available for making adjustments.
This will compute the minimum and maximum intensity in the image and apply the contrast function between these two values for each component.
The Reset button will reset all settings to the default values, using a Normal Linear transform and the full intensity range.
Use the Locked checkbox to synchronize the three-color component together (Locked) or to allow separate adjustment (Unlocked) of both the contrast transform function and the range of values. This can be used to create a custom pseudo-color LUT for a monochrome image, or to create a color balance effect for RGB images.
Similar to Hi/Lo, this function continually updates based on intensity changes in the image.
Select from the various contrast stretches or LUTs, options vary based on whether the image is monochrome or color. After selecting one of the transform functions, the curve on the histogram is updated to reflect the chosen function.
Only monochrome images may be tinted, the Tint controls are grayed out for color images. Select one of the predefined tints from the drop-menu or create your own by selecting the Customized Contrast Tint List icon to the right.
When it comes to making contrast enhancements, some data sets require an added level of control in order to fine tune settings for optimal display. HCImage provides several methods for fine tuning the selected range used for the contrast enhancements, as well as the ability to customize LUTs. The histogram may be undocked and enlarged to provide more detail when making adjustments.
For more control, there are several methods for making adjustments to the selected range of the contrast enhancement. The example below shows each method, followed by a description.
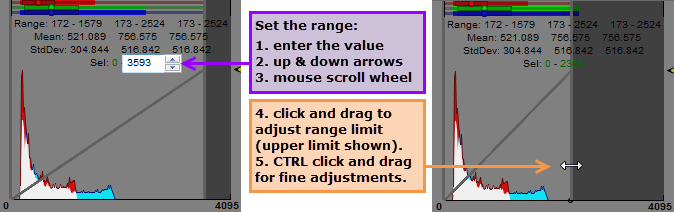
Manually Enter - highlight one of the selected range values and then enter the range value.
Spin Box - hover over the selected range values and then click on the up and down arrows to adjust the values.
Scroll - select the range to change and then scroll up or scroll down using the mouse scroll wheel.
Ctrl & Drag - hover over the upper or lower range limit bar (upper limit bar shown above) and the cursor will change to a left right arrow. Press and hold CTRL, then click and drag the cursor to the left to decrease the range limit or to the right to increase it.
Custom LUTs provide an added level of precision for fine tuning contrast enhancements. Users can tweak one of the predefined LUTs or create their own. To customize a LUT, click on an area of the histogram to define a point in the curve, then click and drag to stretch the curve.
