To save images created in the multi-dimensional Visualizer, use the items in File of the Menu Toolbar.
Images from the Visualizer can be copied to a HCImage Image Document. The image may be enhanced and then saved in a variety of image formats.
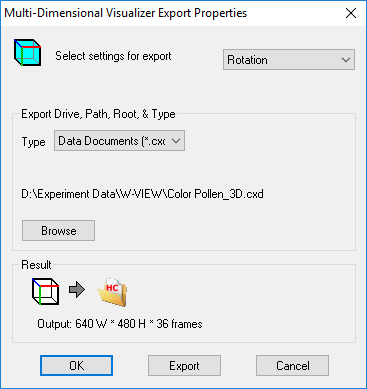
To create a multi-image file, use the Visualizer Export Properties dialog.

This dialog allows the current Visualization and movie settings to be applied to the source data and output as a single file, a movie file or other file sequences. The rotational settings of the movie depend on the current movie as defined in the Visualizer Properties and the Visualizer.
Settings: Rotation, Time and Rotation/Time. Depending on the available data and the Group Mode selected Rotation may be the only setting available.
Note: The Group Mode allows each group of related fields to be rendered as a group. This is useful for time-lapse sequences of Z scans. Each Z scan is group and is rendered in three dimensions, each group is rendered sequentially giving the capability of 4-D movies.
If more than one group is processed, each group can be exported to the same file (one file name for all groups). See below for examples of the Result Frame which diagrammatically describes the exported results.
Select the type of destination file (e.g., avi movie file, cxd file or individual image files per frame). The Browse button allows the destination file properties to be set, including file path, root name and file type if needed.
The Result frame graphically shows how the output file will be created, the Output Data File type, and the rendered image width and height. Here are some examples showing the variety of output formats available:
The current view is exported out as individual tiff images or as a multipage tiff.

The current view is exported out as images organized in a data document.

The current view is exported out as an AVI.

One file for All Groups (Data Document file format)
One file for All Groups (AVI Movie file format)
One file for All Groups (individual image file format or multipage tiff).
The OK button will accept the settings and exit the dialog. The Export button will exit the dialog and apply the settings to generate the output data files. The Cancel button will ignore changes to the settings and exit the dialog.